
Have you ever opened your lunch container at noon only to find a sad, wilted pile of greens? It is a common frustration that ruins healthy eating intentions. But what if your Friday lunch could taste just as crisp and fresh as it did on Sunday night?
The solution lies in vertical layering. By stacking ingredients strategically, you separate the dressing from the delicate greens. This method preserves texture and flavor perfectly. It transforms the way you view meal prep, turning it from a chore into a culinary art form.
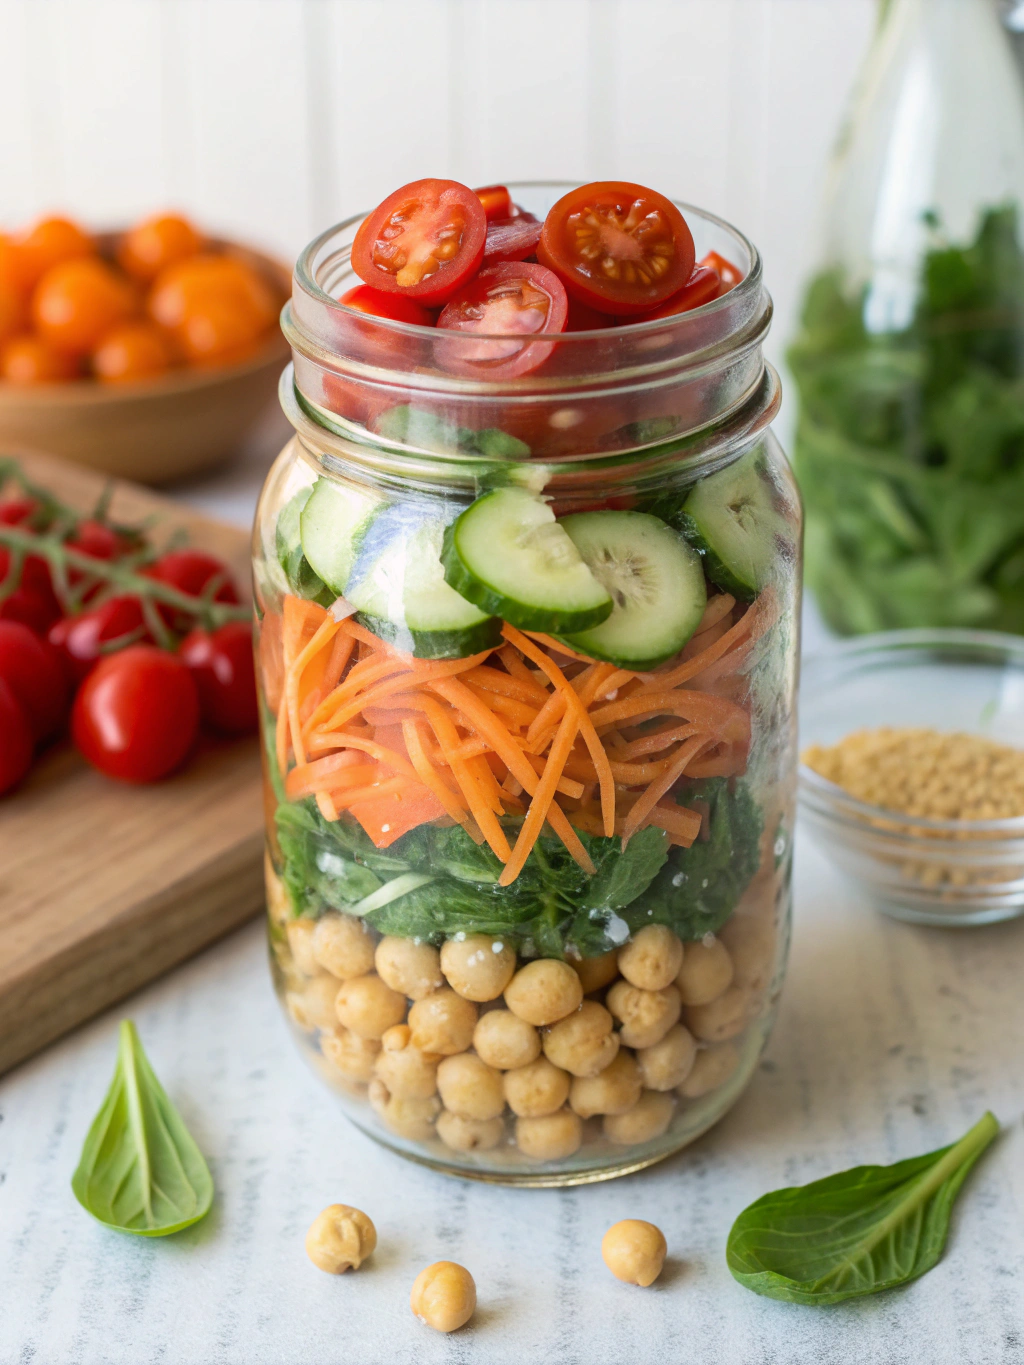
Enter the gluten-free chickpea mason jar salad. This recipe is not just a trend; it is a practical lifestyle hack. It combines robust flavors with the convenience of grab-and-go packaging. Best of all, it remains crunchy for up to five days in the refrigerator.
Ingredients List
To build the perfect jar, you need ingredients that withstand marinating and others that stay dry. The quality of your produce will dictate the final flavor profile. Select organic vegetables where possible for the best taste.
Here is what you will need to assemble these vibrant jars:
- Canned Chickpeas (Garbanzo Beans): 2 cans (15 oz each), rinsed and thoroughly dried. These provide the hearty, nutty base.
- English Cucumber: 1 large, diced. English cucumbers are preferred for their thin skin and lower water content.
- Cherry or Grape Tomatoes: 1 pint, halved. These add a burst of sweetness and hold up well against acidity.
- Red Onion: ½ medium onion, finely chopped. Soaking them in the dressing mellows their bite.
- Bell Peppers: 1 red and 1 yellow, diced. They add a satisfying crunch and a pop of color.
- Quinoa (Optional): 1 cup cooked. This adds texture and ensures the meal is celiac lunch prep friendly and filling.
- Feta Cheese: ½ cup crumbled. Use a vegan feta alternative to keep this dairy-free.
- Fresh Parsley: 1 bunch, chopped. Fresh herbs lift the flavor profile significantly.
- Mixed Greens or Arugula: 4-5 cups. This is the “air” layer at the top.
The Lemon-Herb Vinaigrette
- Extra Virgin Olive Oil: ½ cup. Use high-quality oil for the best mouthfeel.
- Fresh Lemon Juice: ¼ cup. Freshly squeezed is non-negotiable for brightness.
- Dried Oregano: 1 teaspoon. Adds a classic Mediterranean earthiness.
- Garlic: 1 clove, minced.
- Salt and Black Pepper: To taste.
Timing
Efficiency is the cornerstone of this recipe. You are making four to five lunches in the time it takes to make one.
Preparation Time: 20 minutes
Cooking Time: 0 minutes (15 minutes if cooking quinoa from scratch)
Total Time: 20 minutes
Compared to preparing a fresh lunch every morning, this method saves approximately 80 minutes per week. That is nearly an hour and a half reclaimed for your morning routine. It is a high-return investment on your Sunday afternoon.
Step-by-Step Instructions
The secret to a successful gluten-free chickpea mason jar salad is the order of operations. Do not deviate from the layering sequence. This physics-based approach keeps moisture where it belongs.
Step 1: The Foundation (Dressing)
Whisk together the olive oil, lemon juice, minced garlic, oregano, salt, and pepper in a small bowl. Adjust the acidity to your liking. Pour 2 to 3 tablespoons of dressing directly into the bottom of each mason jar (quart-sized jars work best).
Step 2: The Marination Layer
Add the chopped red onions directly into the dressing. Letting the onions sit in the acid removes their harsh, raw “bite” and essentially pickles them slightly. Next, add the harder vegetables like cucumbers, peppers, and cherry tomatoes.
These vegetables are robust enough to sit in the dressing without becoming mushy. In fact, they absorb the flavor, tasting even better on day three than on day one.
Step 3: The Protein Barrier
Layer the rinsed and dried chickpeas on top of the hard vegetables. If you are using cooked quinoa, add it here as well. This layer acts as a barrier. It protects the more delicate ingredients above from the moisture below.
Step 4: The Flavor Boosters
Add your crumbled feta cheese and chopped fresh parsley. Placing the cheese here keeps it moist but prevents it from dissolving into the vinaigrette. If you are adding seeds or nuts for extra crunch, place them in this layer too.
Step 5: The Green Canopy
Finally, stuff the remaining space in the jar with your mixed greens or arugula. Pack them in tightly. Because they are at the very top, far away from the dressing, they will remain crisp and dry until you are ready to eat.
Screw the lids on tightly and place the jars upright in the refrigerator immediately.
Nutritional Information
This salad is a nutritional powerhouse designed to provide sustained energy. It avoids the afternoon sugar crash common with carb-heavy lunches.
Each jar provides approximately:
- Calories: 450 kcal
- Protein: 18g
- Fiber: 12g
- Fat: 22g (mostly healthy monounsaturated fats)
- Carbohydrates: 45g
The high fiber content from the chickpeas and vegetables aids in digestion and promotes satiety. You will feel full longer, reducing the temptation to snack between meals. Furthermore, the vitamin C from the lemon and peppers enhances iron absorption from the greens.
Healthier Alternatives for the Recipe
While the standard recipe is healthy, you can tweak it to fit specific dietary goals. Customization is the beauty of the mason jar method.
Low-Carb / Keto Option:
Swap the chickpeas and quinoa for diced grilled chicken breast or hard-boiled eggs. This drastically reduces the carbohydrate count while boosting the protein. Ensure the chicken is fully cooled before adding it to the jar to prevent condensation.
Vegan Variation:
Omit the feta cheese or replace it with a dairy-free almond ricotta. You can also add nutritional yeast to the dressing for a cheesy flavor without the dairy. This makes for a perfect gluten-free chickpea mason jar salad that is purely plant-based.
Boost the Omega-3s:
Add a tablespoon of hemp hearts or walnuts to the “Flavor Booster” layer. This simple addition supports brain health and adds a delightful texture contrast.
Serving Suggestions
When it is time to eat, you have two options. Understanding how to serve the salad ensures you get the perfect distribution of dressing.
The Shake Method:
If you are eating directly from the jar, ensure there is a little headspace at the top. Shake the jar vigorously for 10 seconds. This coats the greens with the dressing from the bottom. It requires a bit of maneuvering to eat, but saves on dishes.
The Bowl Method (Recommended):
Unscrew the lid and dump the contents into a large bowl. Because of the packing order, the greens will land first, followed by the proteins, and finally the dressing and marinated veggies on top. It perfectly dresses the salad instantly.
Pair this salad with a side of gluten-free crackers or a piece of fruit for a well-rounded meal.
Common Mistakes to Avoid
Even with a simple recipe, small


